3DoFと予備、見渡すことしかできない自由度3のOculus Goや、スマホVRとは別次元の歩き回れる自由度6の6DoF対応、Oculus Questで、デザインツール試作。
大好きなベジェ曲線をVR化してみたところ、想像以上に楽しいものでした。
「BezierVR for Oculus Quest」
ベジェ曲線とは、視点終点に加えて制御点を2つ加えて計算してつくる曲線。イラストレーターや、スムーズに拡大縮小できるフォントなどで使われています。(2Dベジェ曲線 - 一日一創2012)
4点 p[0]〜p[3] から曲線を構成する点 pc(t) ただし tは0以上1以下 を求めるベクトルの計算(線形代数)アルゴリズムは Wikipedia を見るとこんな感じ。(参考、Wikipedia ベジェ曲線)
p[4] p4 = p[0] + (p[1] - p[0]) * t p5 = p[1] + (p[2] - p[1]) * t p6 = p[2] + (p[3] - p[2]) * t p7 = p4 + (p5 - p4) * t p8 = p5 + (p6 - p5) * t pc(t) = p7 + (p8 - p7) * t
これをThree.jsベースのA-Frameで表現して、4点を持って動かせるようにしたら、ベジェ曲線エディタのできあがり!両手で直感的にぐねぐね動かしながら、自由に眺められるのが気持ち良すぎて危険なレベル。
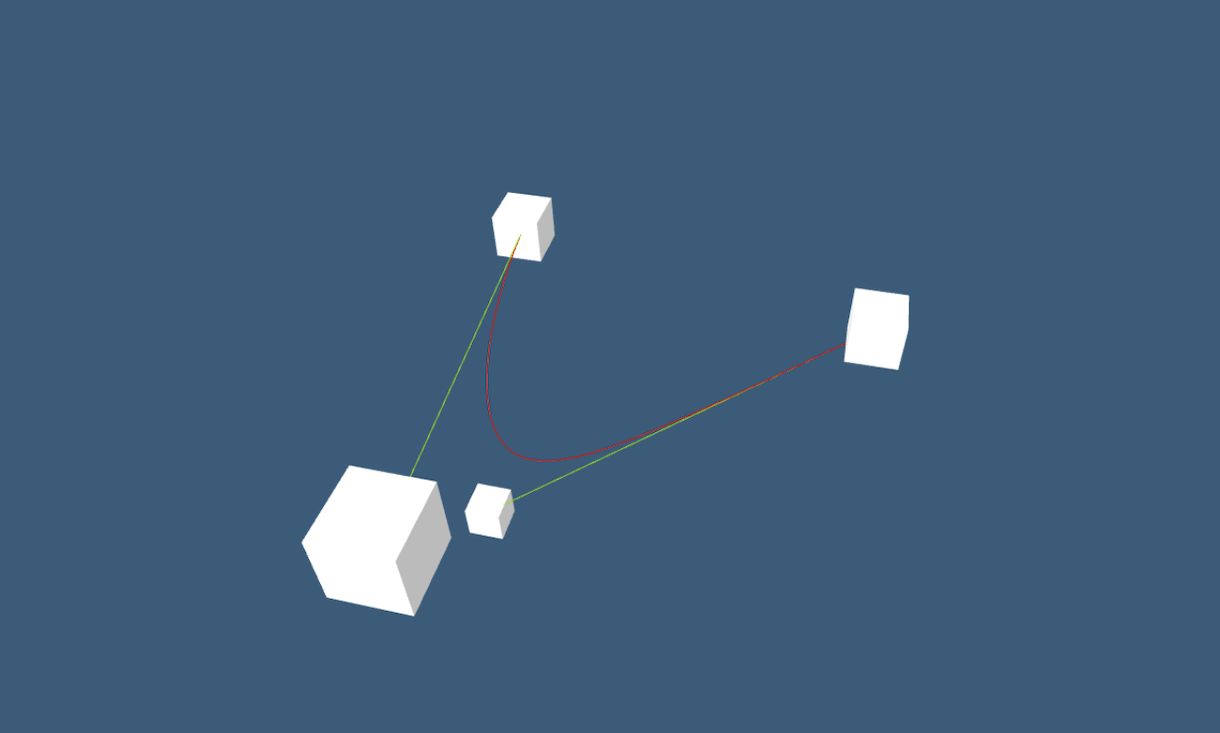
PCでもベジェ曲線がでる様子は確認できますが、一度はぜひVRで、ご体験を!
(マウスで視点変更、カーソルで移動、ベジェ曲線編集不可)
<!DOCTYPE html> <html> <head> <meta charset="utf-8"/> <title>BezierVR</title> <script src="https://aframe.io/releases/0.9.2/aframe.min.js"></script> </head> <body> <script>'use strict' window.onload = function() { const scene = document.querySelector('a-scene') let p = new Array(4) let pnt = new Array(4) let lines = [] let line1 let line2 const init = function() { for (let i = 0; i < 4; i++) { if (pnt[i]) scene.removeChild(pnt[i]) } for (let i = 0; i < lines.length; i++) { scene.removeChild(lines[i]) } lines = [] const rndw = 1 for (let i = 0; i < 4; i++) { const x = Math.random() * rndw - rndw / 2 const y = Math.random() * rndw + .5 const z = Math.random() * rndw - 1 p[i] = new THREE.Vector3(x, y, z) let box = document.createElement('a-box') box.setAttribute('position', p[i]) const size = 0.05 box.setAttribute('width', size) box.setAttribute('height', size) box.setAttribute('depth', size) box.setAttribute('mixin', 'voxel'); scene.appendChild(box) pnt[i] = box } } const f = function(p0, p1, t) { const p0c = p0.clone() const p1c = p1.clone() return p0c.add(p1c.sub(p0c).multiplyScalar(t)) } const calcBezier = function() { const div = 40 let op = p[0] if (lines.length == 0) { for (let i = 0; i < div + 2; i++) { const line = document.createElement('a-entity') scene.appendChild(line) lines.push(line) } line1 = lines[div] line2 = lines[div + 1] } let col = '#ff0000' for (let i = 1; i <= div; i++) { const t = 1 / div * i const p4 = f(p[0], p[1], t) const p5 = f(p[1], p[2], t) const p6 = f(p[2], p[3], t) const p7 = f(p4, p5, t) const p8 = f(p5, p6, t) const p9 = f(p7, p8, t) let line = lines[i - 1] line.setAttribute('line', { start: op, end: p9, color: col }); op = p9 } col = '#80e000' line1.setAttribute('line', { start: p[0], end: p[1], color: col }); line2.setAttribute('line', { start: p[3], end: p[2], color: col }); } init() calcBezier() let np = -1 let mp = -1 setInterval(function() { let flg = 0 if (np >= 0) { const hp = handright.getAttribute('position') p[np] = hp.clone() pnt[np].setAttribute('position', p[np]) flg = true } if (mp >= 0) { const hp = handleft.getAttribute('position') p[mp] = hp.clone() pnt[mp].setAttribute('position', p[mp]) flg = true } if (flg) calcBezier() }, 1000 / 72) // 72Hz const selectNear = function(hand) { const hp = hand.getAttribute('position') let min = .5 let np = -1 for (let i = 0; i < 4; i++) { let d = p[i].distanceTo(hp) if (d < min) { min = d np = i } } return np } handright.addEventListener('triggerdown', function(evt) { np = selectNear(handright) }) handright.addEventListener('triggerup', function(evt) { np = -1 }) handright.addEventListener('gripdown', function(evt) { np = selectNear(handright) }) handright.addEventListener('gripup', function(evt) { np = -1 }) handleft.addEventListener('triggerdown', function(evt) { mp = selectNear(handleft) }) handleft.addEventListener('triggerup', function(evt) { mp = -1 }) handleft.addEventListener('gripdown', function(evt) { mp = selectNear(handleft) }) handleft.addEventListener('gripup', function(evt) { mp = -1 }) // B button handright.addEventListener('bbuttondown', function(evt) { init() calcBezier() }) } </script> <a-scene> <a-assets> <a-mixin id="voxel" geometry="primitive: box; height: 0.1; width: 0.1; depth: 0.1" material="shader: standard"> </a-mixin> </a-assets> <a-sky color="#335c7c"></a-sky> <a-entity id=handleft oculus-touch-controls="hand: left"></a-entity> <a-entity id=handright oculus-touch-controls="hand: right" laser-controls raycaster="showLine: true; far: .05" line="color: white; opacity: 0.75;"></a-entity> </a-scene> </body> </html>
1ファイル書くだけ簡単、WebVRでVR開発。オススメです!
links
- VRではじめる現代HTML入門 - Oculus Quest x 福井高専生
- 50行で作るVRマイクラ風 / boxcraft for Oculus Quest with A-Frame
- モバイル時代こそバス! つつじバスロケVRビジュアライズ - リアルタイムオープンデータ x Oculus Quest

