JSで手軽なWebMeganeもオススメながら、iPhoneネイティブアプリとして作ると、顔認識や、QRコード認識などが高速で楽しい!
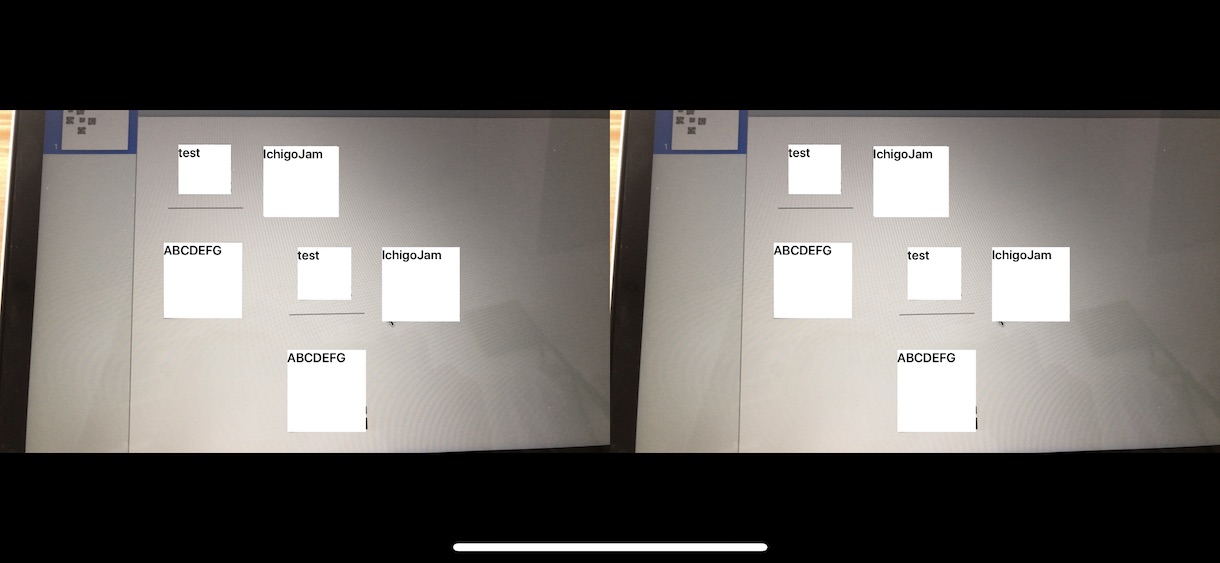
リアルタイムにQRコード内容をデコードして、視界をオーバーレイ(上書き)するメガネができた。
「megane - qrdetector on GitHub」 Swift4で実装
ウィンクシャッターが便利だったGoogle Glassのように、手軽に写真撮影もついでに実装。
ボリュームダウンキーで、シャッター(初回のみダイアログがでるので、VRにする前に押しておこう)
ボリュームアップキーで、視界をズームすることもできる(現在は、1920x1080の画像をデジタルズーム)
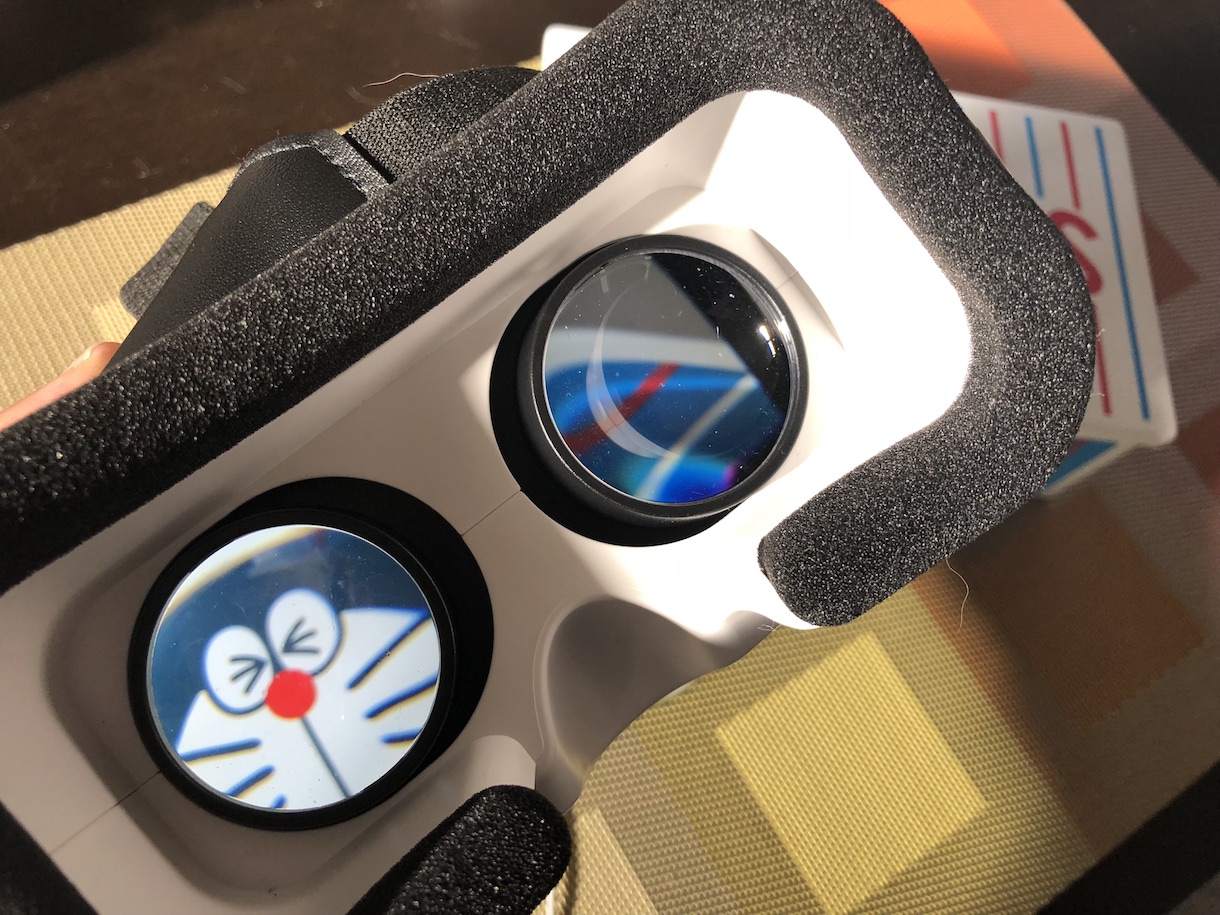
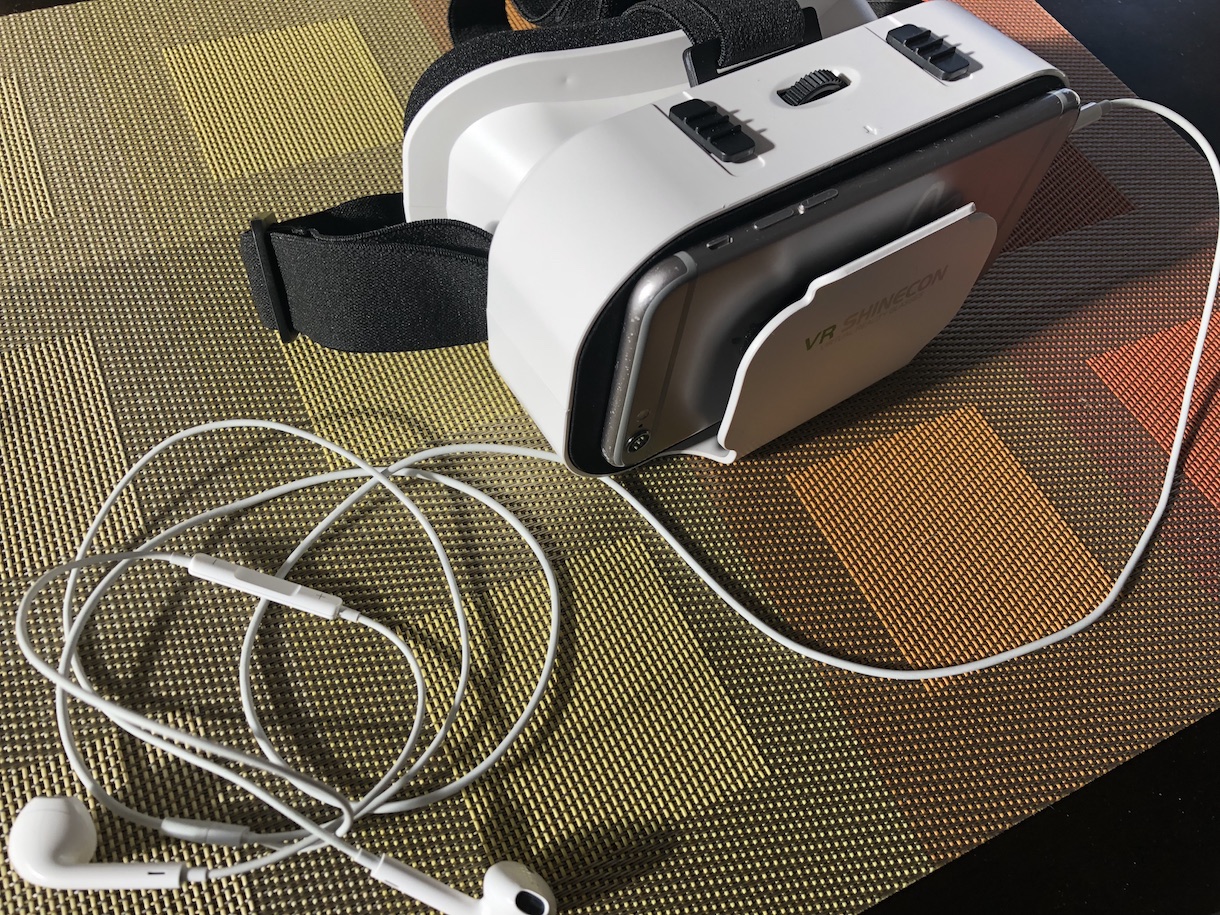
こちら「オタマートで売ってるVRゴーグル」の一番安いもの。ボリュームアップダウンが上からアクセスできる!
ボリュームアップダウンキーのついたイヤホンを接続すると、手元でも操作できるようになって便利。
デジタルメガネなUXづくり、いろいろ試していきましょう。
鯖江の道の駅、西山公園前のバス停。日本語表記しかない標識にQRコードをつけておけば、リアルタイムに見ている人の母国語に変換できそう。

Let's hack your sight!
AppDelegate.swift
import UIKit @UIApplicationMain class AppDelegate: UIResponder, UIApplicationDelegate { var window: UIWindow? func application(_ application: UIApplication, didFinishLaunchingWithOptions launchOptions: [UIApplicationLaunchOptionsKey: Any]?) -> Bool { return true } func applicationWillResignActive(_ application: UIApplication) { } func applicationDidEnterBackground(_ application: UIApplication) { NotificationCenter.default.post(name: NSNotification.Name(rawValue: "applicationDidEnterBackground"), object: nil) } func applicationWillEnterForeground(_ application: UIApplication) { NotificationCenter.default.post(name: NSNotification.Name(rawValue: "applicationWillEnterForeground"), object: nil) } func applicationDidBecomeActive(_ application: UIApplication) { } func applicationWillTerminate(_ application: UIApplication) { } }
ViewController.swift
// // ViewController.swift // megane, QR code detector glass with VR goggle // // CC BY taisukef on 2018/05/24. // https://fukuno.jig.jp/2133 // import UIKit import AVFoundation import MediaPlayer class ViewController: UIViewController, AVCaptureVideoDataOutputSampleBufferDelegate { override func viewDidLoad() { super.viewDidLoad() self.view.backgroundColor = UIColor.black self.imageView1 = UIImageView() self.imageView2 = UIImageView() let w = self.view.frame.width let h = self.view.frame.height let w2 = w / 2 let h2 = w2 * 1080 / 1920 let y = (h - h2) / 2 self.imageView1.frame = CGRect(x:0, y:y, width:w2, height:h2) self.imageView2.frame = CGRect(x:self.view.frame.width / 2, y:y, width:w2, height:h2) self.view.addSubview(self.imageView1) self.view.addSubview(self.imageView2) self.initNotificationsFromAppDelegate() } override func didReceiveMemoryWarning() { super.didReceiveMemoryWarning() // Dispose of any resources that can be recreated. } var input:AVCaptureDeviceInput! var output:AVCaptureVideoDataOutput! var session:AVCaptureSession! var camera:AVCaptureDevice! var imageView1:UIImageView! var imageView2:UIImageView! override func viewWillAppear(_ animated: Bool) { self.configureCamera() self.listenVolumeButton() } // notifications foreground and background func initNotificationsFromAppDelegate() { NotificationCenter.default.addObserver(self, selector: #selector(type(of: self).viewWillEnterForeground(notification:)), name: NSNotification.Name(rawValue: "applicationWillEnterForeground"), object: nil) NotificationCenter.default.addObserver(self, selector: #selector(type(of: self).viewDidEnterBackground(notification:)), name: NSNotification.Name(rawValue: "applicationDidEnterBackground"), object: nil) } @objc func viewWillEnterForeground(notification: NSNotification?) { print("foreground") self.listenVolumeButton() } @objc func viewDidEnterBackground(notification: NSNotification?) { print("background") self.removeVolumeButton() } // override func viewDidDisappear(_ animated: Bool) { session.stopRunning() for output in session.outputs { session.removeOutput(output) } for input in session.inputs { session.removeInput(input) } session = nil camera = nil } let DETECT_QRCODE = false func configureCamera() { session = AVCaptureSession() // iPhone Xで実験 //session.sessionPreset = AVCaptureSession.Preset.cif352x288 // 34% 荒い //session.sessionPreset = AVCaptureSession.Preset.vga640x480 // 47% 4:3 なかなかきれい //session.sessionPreset = AVCaptureSession.Preset.iFrame1280x720 // CPU50% 16:9 かわらない? //session.sessionPreset = AVCaptureSession.Preset.hd1280x720 // CPU50% 16:9 きれい session.sessionPreset = AVCaptureSession.Preset.hd1920x1080 // CPU88% 16:9 かわらない? iPhone6でもQRcode offならOK! //session.sessionPreset = AVCaptureSession.Preset.hd4K3840x2160 // CPU93% 16:9 かわらない? QRcode offなら実用的 camera = AVCaptureDevice.default( AVCaptureDevice.DeviceType.builtInWideAngleCamera, for: AVMediaType.video, position: .back) // position: .front do { input = try AVCaptureDeviceInput(device: camera) } catch let error as NSError { print(error) } if (session.canAddInput(input)) { session.addInput(input) } output = AVCaptureVideoDataOutput() // AVCapturePhotoOutput() 写真用 output?.videoSettings = [kCVPixelBufferPixelFormatTypeKey as AnyHashable : Int(kCVPixelFormatType_32BGRA)] as! [String : Any] let queue:DispatchQueue = DispatchQueue(label: "myqueue", attributes: .concurrent) output.setSampleBufferDelegate(self, queue: queue) output.alwaysDiscardsLateVideoFrames = true // 間に合わないものは処理しない if (session.canAddOutput(output)) { session.addOutput(output) } session.startRunning() } var zoom:CGFloat = 1.0 func captureOutput(_: AVCaptureOutput, didOutput: CMSampleBuffer, from: AVCaptureConnection) { // from.videoOrientation = .portrait //デバイスの向きを設定、縦の時 from.videoOrientation = .landscapeLeft //デバイスの向きを設定、landscape left の時 DispatchQueue.main.sync(execute: { var image = self.imageFromSampleBuffer(sampleBuffer: didOutput) image = resizeImage(image: image, ratio: zoom) if DETECT_QRCODE { image = drawQR(image: image) } self.imageView1.image = image self.imageView2.image = image }) } func resizeImage(image: UIImage, ratio: CGFloat) -> UIImage { if ratio == 1.0 { return image } let iw = image.size.width / ratio let ih = image.size.height / ratio let size = CGSize(width: iw, height: ih) UIGraphicsBeginImageContext(size) image.draw(in: CGRect(origin: CGPoint(x:-(image.size.width - iw) / 2, y:-(image.size.height - ih) / 2), size: image.size)) let resimage = UIGraphicsGetImageFromCurrentImageContext()! UIGraphicsEndImageContext() return resimage } func drawQR(image: UIImage) -> UIImage { UIGraphicsBeginImageContext(image.size) let rect = CGRect(x:0, y:0, width:image.size.width, height:image.size.height) image.draw(in: rect) let g = UIGraphicsGetCurrentContext()! g.setStrokeColor(UIColor.white.cgColor) g.setLineWidth(1) let font = UIFont.boldSystemFont(ofSize: 14) let textStyle = NSMutableParagraphStyle.default.mutableCopy() as! NSMutableParagraphStyle let textFontAttributes = [ NSAttributedStringKey.font: font, NSAttributedStringKey.foregroundColor: UIColor.black, NSAttributedStringKey.paragraphStyle: textStyle ] // 顔認識もおもしろい // let detector : CIDetector = CIDetector(ofType: CIDetectorTypeFace, context: nil, options:[CIDetectorAccuracy: CIDetectorAccuracyLow] )! // 読める四角は今のところひとつだけ // let detector : CIDetector = CIDetector(ofType: CIDetectorTypeRectangle, context: nil, options:[CIDetectorAccuracy: CIDetectorAccuracyHigh, CIDetectorAspectRatio: 1.0] )! let detector : CIDetector = CIDetector(ofType: CIDetectorTypeQRCode, context: nil, options:[CIDetectorAccuracy: CIDetectorAccuracyHigh] )! let features : NSArray = detector.features(in: CIImage(image: image)!) as NSArray if features.count > 0 { for feature in features as! [CIQRCodeFeature] { var rect: CGRect = (feature as AnyObject).bounds rect.origin.y = image.size.height - rect.origin.y - rect.size.height // QRコードを上書き! g.beginPath() g.setFillColor(UIColor.white.cgColor) g.addRect(rect) g.fillPath() feature.messageString?.draw(in: rect, withAttributes: textFontAttributes) } } let resimage = UIGraphicsGetImageFromCurrentImageContext() UIGraphicsEndImageContext() return resimage! } func imageFromSampleBuffer(sampleBuffer: CMSampleBuffer) -> UIImage { let imageBuffer: CVImageBuffer = CMSampleBufferGetImageBuffer(sampleBuffer)! CVPixelBufferLockBaseAddress(imageBuffer, CVPixelBufferLockFlags(rawValue: 0)) let baseAddress = CVPixelBufferGetBaseAddressOfPlane(imageBuffer, 0) let bytesPerRow = CVPixelBufferGetBytesPerRow(imageBuffer) let width = CVPixelBufferGetWidth(imageBuffer) let height = CVPixelBufferGetHeight(imageBuffer) let colorSpace = CGColorSpaceCreateDeviceRGB() let bitmapInfo = (CGBitmapInfo.byteOrder32Little.rawValue | CGImageAlphaInfo.premultipliedFirst.rawValue) let context = CGContext(data: baseAddress, width: width, height: height, bitsPerComponent: 8, bytesPerRow: bytesPerRow, space: colorSpace, bitmapInfo: bitmapInfo) let imageRef = context!.makeImage() CVPixelBufferUnlockBaseAddress(imageBuffer, CVPixelBufferLockFlags(rawValue: 0)) return UIImage(cgImage: imageRef!) } // volume switch var initialVolume = 0.0 var volumeView: MPVolumeView? func listenVolumeButton() { volumeView = MPVolumeView(frame: CGRect(x:-3000, y:0, width:0, height:0)) view.addSubview(volumeView!) let audioSession = AVAudioSession.sharedInstance() do { try audioSession.setActive(true) let vol = audioSession.outputVolume initialVolume = Double(vol.description)! if initialVolume > 0.9 { initialVolume = 0.9 } else if initialVolume < 0.1 { initialVolume = 0.1 } } catch { print("error: \(error)") } audioSession.addObserver(self, forKeyPath: "outputVolume", options: NSKeyValueObservingOptions.new, context: nil) } func removeVolumeButton() { AVAudioSession.sharedInstance().removeObserver(self, forKeyPath: "outputVolume") volumeView?.removeFromSuperview() } override func observeValue(forKeyPath keyPath: String?, of object: Any?, change: [NSKeyValueChangeKey : Any]?, context: UnsafeMutableRawPointer?) { if keyPath == "outputVolume" { let volume = (change?[NSKeyValueChangeKey.newKey] as! NSNumber).floatValue let newVolume = Double(volume) if newVolume > initialVolume + 0.05 { if let view = volumeView?.subviews.first as? UISlider { // volume up pressed view.value = Float(initialVolume) if zoom < 12.0 { zoom *= 1.2 } else { zoom = 1.0 } print("zoom: \(zoom)") } } else if newVolume < initialVolume - 0.05 { if let view = volumeView?.subviews.first as? UISlider { // volume down pressed view.value = Float(initialVolume) /* if zoom > 1.0 { zoom /= 1.2 } */ if let image = self.imageView1.image { saveImage(image: image) print("save image") } } } } } // save private func saveImage(image: UIImage) { UIImageWriteToSavedPhotosAlbum(image, nil, nil, nil) } }
「megane - qrdetector on GitHub」 in Swift4
links
- WebMegane - your new digital sight / デジタルな視界 on iPhone Safari x VR goggles (JS、webアプリ版)


